
Baby Led Weaning: Is It Worth the Hype? Absolutely!!
In previous blog posts we delved into the topic of weaning; all of the things you may expect or experience, as well as how to truly deal with them. I briefly mentioned Baby Led Weaning when discussing an approach to distract your child when trying to gently nudge them in the direction of ending a breastfeeding relationship. Baby Led Weaning is simply adding solid foods to your child’s diet in the form of appropriate sizes and letting them feed themselves. No feeding purees with a spoon and trying to catch it back into the spoon when baby spits it out. If you haven’t heard of this, you’re probably as confused as I was about how on earth this is possible. Let me rewind and share the evolution of how I came to discover something that completely took the chaos and anxiety out of feeding infants while trying to manage toddlers and young children.
I had my first baby and was determined to do everything “right” as suggested by pediatricians, generic parenting books, and mom gurus around the world. Rice cereal first, check. Introduce orange purees, but never a fruit first because then they will never eat a vegetable. After orange colors comes another color vegetable until all the standard options were introduced. (Does this practice age me?! Probably.) Then work my way through the fruits and disgusting meat purees. All the while mastering the baby spoon technique where you can immaculately scoop up the puree they immediately spit out. Then I had my second baby and said “my baby deserves better than premade purees.” So I ventured into making my own and quickly realized cooking foods to puree them is insanely time consuming, which for some reason I never thought about prior to taking it on. On top of that I had a toddler that’s hit the zero to hangry phase in a matter of seconds. I vowed to never do that again when I stumbled across some crazy, “crunchy” mom technique of giving babies table foods, Baby Led Weaning. Baby three came along and I decided to give it a shot, still a little nervous about how it completely goes against everything you’re “supposed” to do. It was still a fairly new concept (again, aging myself), but I was feeling pretty confident having kept two other children alive. Then my mind was blown. How on earth could something so incredibly messy reduce ALL the chaos and anxiety that surrounded lunchtime with children?!
For me, Baby Led Weaning saved my sanity.
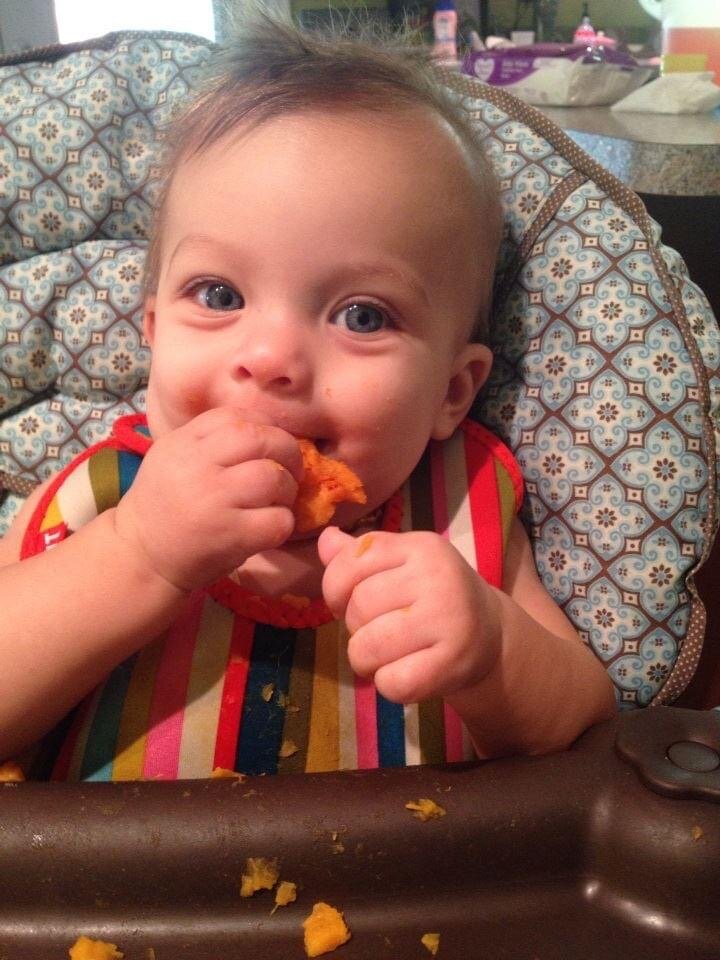
Alaina’s daughter, Julia, eating apricot. Or sweet potato. It’s hard to tell at this point LOL
Lunchtime would come and I had to figure out how to feed a 4 year old, 2 year old, and 6/7 month old…at the same time. Yes, when one decides they’re hungry then they’re ALL hungry. It was the hardest part of my day, which sounds silly. Trying to spoon feed a baby in between preparing something for the other two, getting drink refills, cleaning up spills, and trying to figure out how to feed yourself is hard! Baby Led Weaning allowed us to eat together without the chaos of preparing multiple meals. More importantly it eliminated the unreasonable amount of *time* it took to spoon feed a baby while trying to manage other children’s requests in addition to feeding yourself. It was messy, but I was able to find a peace in that mess and chaos that I had not had prior. I was able to let that go because it made everything else infinitely easier.
Baby Led Weaning is not as new as it was when I began and has become a more mainstream practice. Many may already be familiar with it or have at least heard of it. You can find more in depth information, including properly portioning/cutting, in the book “Baby Led Weaning: The Essential Guide” by Gill Rapley, PhD and Tracey Murkett. You can also find additional information online at www.babyledweaning.com as well as different Facebook groups to discuss technique/recipes. I’d like to discuss some of the basics and some of the tips and tricks I learned along the way. If some of this resonates with you, I encourage you to check out those resources to learn more!
As I stated before, Baby Led Weaning (BLW) is giving your child properly sized table foods (not bite size), and focusing on providing the same things you are eating. If you’re eating a pear, give your child a piece of pear. If you’re eating a piece of chicken with broccoli, give them a portioned piece of chicken and a piece of broccoli. NO, they don’t need teeth. I’ve witnessed one of my children gum the life out of a pork chop before deciding she was done with it. Some of the signs that they are ready for BLW is that they can sit up on their own, have head and trunk control, able to reach and grab things using a pincer grasp (palmar grasp, using a fist, is not effective in getting food into their mouth), able to make chewing movements, showing interest in foods, and the loss of the tongue thrust reflex. Have you ever tried to spoon feed a baby and they just keep sticking their tongue out and you have to pry the spoon into their mouth, then they immediately spit half of it out? That’s the tongue thrust reflex, and it’s a sign they are not developmentally ready to effectively move food around in their mouth to chew and swallow. It is suggested that 6 months is the average readiness age for introducing foods and beginning BLW, however in my experience it was a bit later. If your child has reached the 6 month mark and is not showing signs of readiness, you can certainly consult with your pediatrician and monitor weight gain and developmental growth to make an informed decision.
So why choose this method over traditional puree spoon feeding? As I stated before, for me the main benefit was the time and effort saved in feeding multiple children, which in turn made my life infinitely easier at meal times. In addition to this, BLW allows your baby to really develop fine motor skills as they learn to feed themselves independently. Your baby is not only mastering these skills, but they are making the choices of what they want to eat and how much. It will become very clear what your baby’s food preferences are and when they decide they are done. This can potentially reduce the dilemma of picky eaters. You are exposing them to way more options than a traditional puree and allowing them to explore new textures and flavors. Since you won’t be purchasing pre-made baby foods, you are cutting your grocery costs and only really having to plan meals for the family as a whole. With that, you are also cutting your time preparing foods. There are some exceptions to that, but for the most part all meals will be prepared at the same time. Another added benefit is when you go out somewhere there’s no need to worry about packing a million containers of baby food. Alright, maybe not a million, but that’s what it feels like when you stuff your diaper bag with unnecessary items.

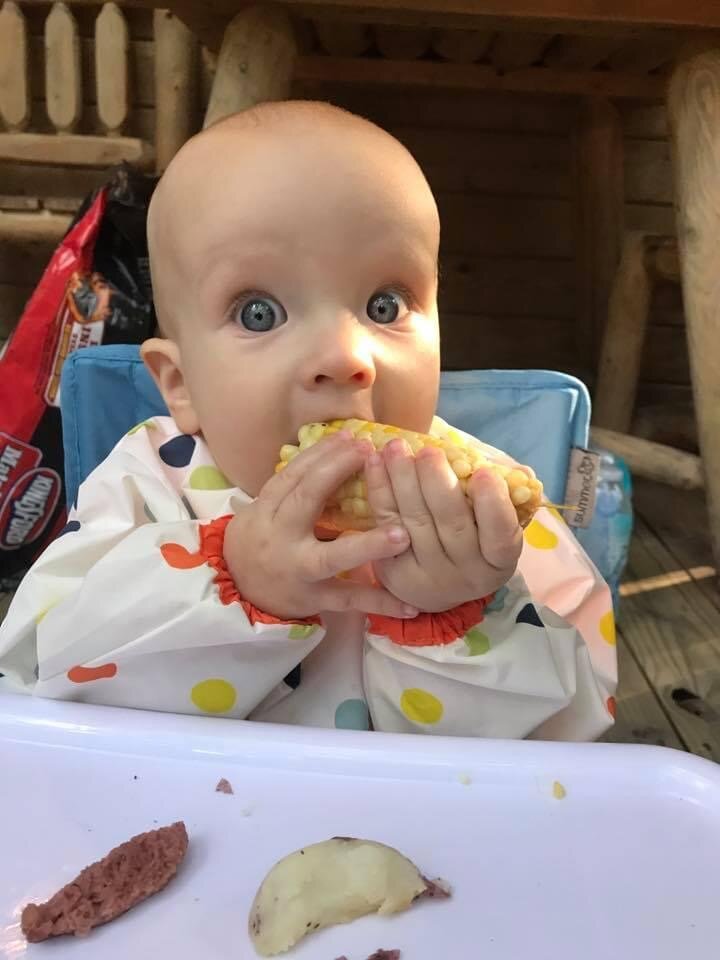
Alaina’s son Jude, experiencing his first solid food! His first BLW experience.
If you’ve made the decision to start BLW and determined your child is ready, there’s really not a lot of preparation to be done. You don’t need a lot of special supplies on hand to begin, although there are some things I found make things a little easier. Here’s what I found most helpful:
The most basic and easy to clean chair you can find. I wanted our children to be seated at the table with us, but a big, bulky highchair with lots of nooks and crannies was not ideal. Trust me, with all the mess you will want something that is easy to clean. The best option I found was the ANTILOP chair from IKEA. It could be easily wiped down and lightweight enough to be moved depending on where we were seated. It served as an extra seat at our dining room table, or a highchair with tray in the kitchen at lunchtime.
A food catching bib. You will want to make sure it’s silicone or some other material that is easy to rinse off. Trust me, you will pull lots of food from that pocket to feed back to baby. If you have nothing to catch it, the food is going straight under their butt and legs and into their diaper and all those adorable little rolls along their legs. It will likely do that anyway, but the bibs help.
A strong suction dish. We used the Bumkin Silicone Grip Dish because it was literally the only dish my children couldn’t break the suction from and toss on the floor. However, I did not introduce plates or silverware until later in the feeding journey so this is certainly not a necessity to get started.
You may be asking yourself, “isn’t this way messier than spoon feeding?!” Yes. Yes it is. You will clean your floors frequently. You will need to carry your baby to the sink to wash their face, hands, and arms. You will likely have to clean food out of their leg rolls. You will find random pieces of food falling out of their diaper and clothes. They will style their hair with any food on their hands. Is it all worth it? Absolutely. Here’s some helpful tips:
Place a mat under their chair—something that can be easily cleaned to keep food trapped in one area and not make a mess throughout the house. I used an old beach towel. When they were done I would shake it outside and wash it when it got terribly dirty.
Remove their clothing if that’s something that’s important to you. Personally, after 3 kids wearing the same clothing I kind of let go of the staining concern. If there was something in particular I cared about I would take it off. You can also find full sleeve, washable bibs that will cover all of their clothing. Or purchase a great stain remover.
Utilize your kitchen sink. There’s no shame in carrying a messy baby to the sink and spraying off their hands, arms and even legs. Don’t waste napkins and paper products trying to wipe out all their crevices. I kept baby wipes stocked in my kitchen to wipe them down only if the mess wasn’t too insane.

Julia devouring an avocado.
There’s another glaring issue here that most people tend to ask about right away. Choking. This is a common concern and honestly a valid one. It would be beneficial for all parents to be familiar with infant CPR. Choking, however, can often be confused with gagging. Gagging is very common when children are starting to eat solids. The gag reflex is a safety mechanism to allow your child to keep larger pieces of food towards the front of their mouth. Some children will gag more than others, but gagging does not mean they are choking or will begin to choke. From this anxious mother’s perspective, it takes some getting used to but it is important to remain calm. It is something you should be familiar with and recognize the difference in the signs of gagging versus choking. Familiarize yourself with the sounds. Choking is often silent while gagging you can hear. No matter what your method of feeding is, you should always be supervising your kids at meal times, especially when they are first learning. Here are some things you can do to help prevent choking:
Make sure they are sitting upright. This is why it’s important to ensure they are able to sit upright independently. Do not use a reclining highchair. If they don’t have the head and trunk control to remain upright on their own, then they are not ready.
Don’t multitask. It’s easy to use meal times to try to get things done but it’s important to sit with them and watch them. You should use this time to eat with them so they can watch your movements as well. They can see how you take a bite, how you chew it, when you swallow, and when you take another bite.
Let them feed themselves. Sometimes we watch them struggle to pick something up and we want to help. If you put something in their mouth it can eliminate the control they have over the object. Allowing them to take bites themselves helps them learn to take proper size bites and control it with their tongue.
Avoid foods that can be choking hazards or the shape and size of a choking hazard. This would be anything round in size like grapes, berries, cherry tomatoes, etc. Things like peanut butter that can get stuck to the roof of their mouth as well as popcorn and stringy vegetables like lettuce or celery. You can find a comprehensive list of choking hazards as well as age appropriate foods here. It is possible to find alternate ways of preparing and serving some of these foods to reduce the risk of choking.
Keep mealtimes focused solely on eating and eliminate distractions. Don’t offer toys to play with while eating or allow them to sit and watch tv. This should be a time for your baby to explore foods and really focus on the skills of eating.
The concept of Baby Led Weaning isn’t difficult, but it does require letting go of some of the things you may have needed more control over. It forces you to give up on things being clean and tidy all the time. It forces you to give your babies some independence, which means standing back while they work through moving around a larger bite than normal. This can be hard; it was for me. But watching them explore the same things you are eating is also really fun. It makes it all totally worth it and you won’t have regrets. Also, you’ll finally get to eat a hot meal with your kids instead of it sitting and getting cold. If that’s not enough to sell you then I don’t know what is!
Even babies can experience the joy of a shrimp boil!